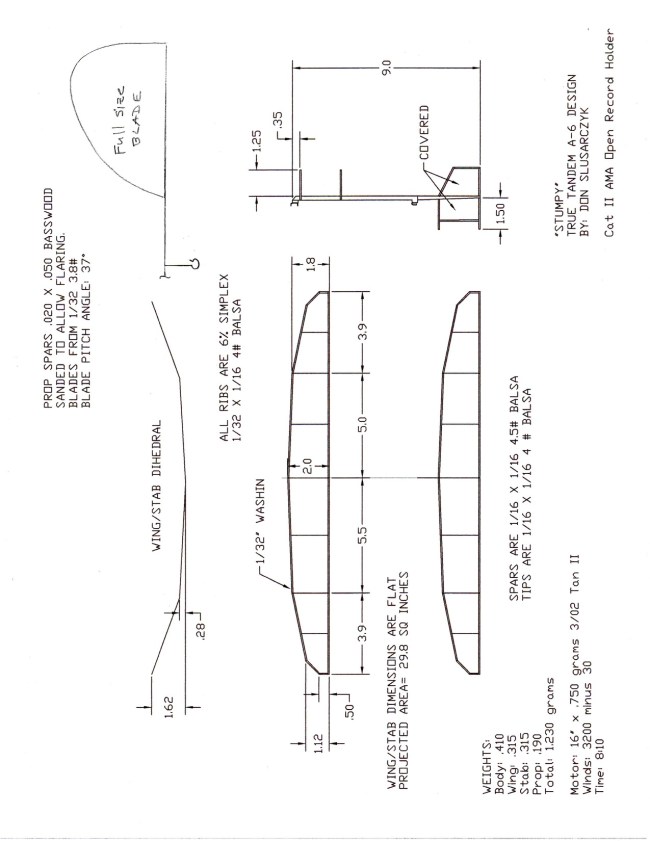
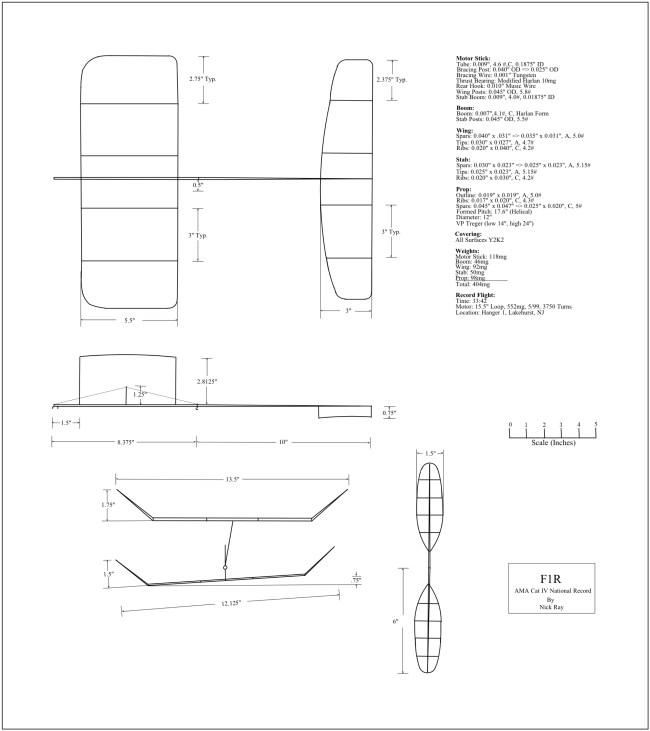
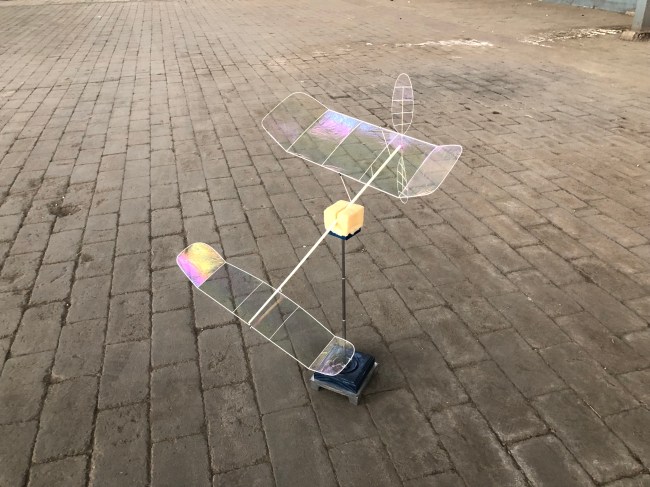
Nick Ray’s Cat IV AMA Record F1R
Click here to download a PDF of the plan.

Balsa-Boron Propeller Construction
by Evan Guyett
Many top F1D fliers have moved to spar-less propellers in the pursuit of top times. In my quest, I have done a lot of experimenting with the construction of balsa-boron propellers in the hopes my times will increase as well. The big challenge of spar-less propellers is retaining all the structural stiffness of a regular propeller while eliminating the main structural member. While carbon is a solid method of producing these new propellers, balsa-boron propellers are less costly and time consuming to make. I can produce two propeller blades in about 4-5 hours without drying time. They can, however, be tricky to construct and cause frustration. This article details my methods for building balsa-boron props.
Choosing the right wood and cross section is critical for the prop outlines. Too thin and the blades are floppy and weak. For my props, I have used 0.024” – 0.027” thick sheets on my outlines. Density: 4.7 – 5.2#. Any thicker I have found it hard to bend without kinking, any thinner and structural stiffness is lost due to side bending. I think that a tapered sheet could possibly give the best results, but I have not tried that so far. I cut 2 outline pieces on my Harlan stripper 0.040” à 0.025” x 9.5” to become one propeller blade. Leave the pieces at 10” for preparation. Four pieces (one propeller) usually weighs 35-40mg. I choose wood that will build the structurally best propeller, but not necessarily the lightest. My prop spars are also very stiff and quite heavy. I use 1/16” rounded 5 – 6# wood with 4 pieces of 0.004” boron. They weigh about 20-30mg for each pair depending on the density. Some weight could probably be trimmed from the prop spars, but after consulting with Kang Lee, they need to be very rigid or the propellers will present problems under high torque.
Before any construction is done, I build a template that is attached to the prop block. It is important to spend some time on the template. A well-built template will save a lot of time and frustration in later steps and can make several propellers at a time. I find very soft 1/32” wood from a hobby store to make my templates and cut out the blade shape and sand a taper into the blade thinner than the outline dimensions. For example, I might sand the root of the template to 0.038” and the tip to 0.023”. It does not have to be a precise sanding. What matters is the template must be below the top of the outline because it makes the boron easier to put on the outline. This step is IMPORTANT. If the template is higher than the outline, it is much harder to press the boron onto the outline and often the boron will go towards the template and glue to the template. Another issue is that it creates more surface area for the outline to glue to the template. This is very frustrating, and I have trashed many potential prop blades because I didn’t sand the template and tore up the blade trying to remove it from the template. After the template is taper sanded, I then sand the edges very smooth, and draw the lines for the ribs and spar line. The blade shape must be very symmetrical along the spar line.

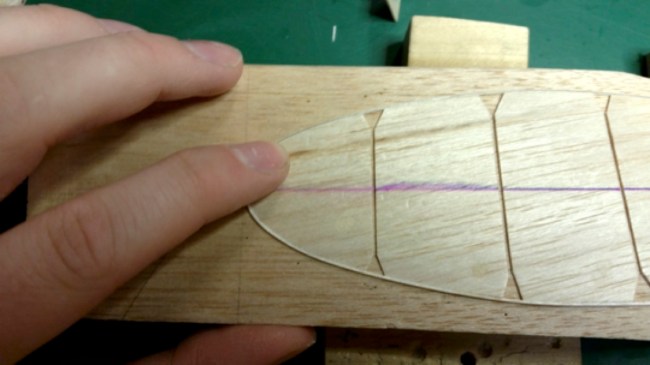
The next thing to do is cut out the slots for the ribs. I first flip the blade over and put several layers of masking tape on the blade.

Then I flip the blade back upright and cut out the slots without cutting through the masking tape. I put V-shaped notches in the end so the ribs do not glue to the template.

I then add tape to the top of the template with the spar line, remove the tape from the bottom, spray glue the bottom of the template and mount it on my prop block.
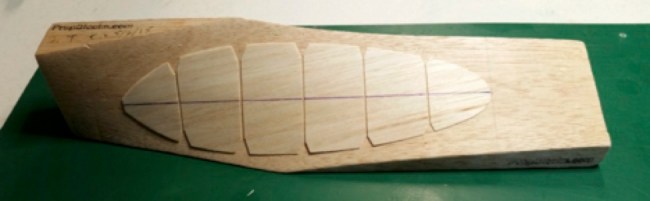
After the template is mounted to the block, I go over the edges of the template vertically with some fine sandpaper to remove any spray glue residue. Now the template is ready and it’s time to start building.
After cutting some outline pieces, I put a mark 0.50” from the tapered end, and line them up as shown in the picture. The outlines are laying on their sides in the picture. Then I make a diagonal cut that perfectly scarf joints the ends. I glue them together with thinned duco cement. Let this joint dry for 20-30 minutes


Soak the outline in water for five minutes, align the scarf joint at the tip of the blade, and secure with a pin and balsa wedge. Then pull the outline over the template, pin in place, and let dry for thirty minutes.


After the blade is dry, trim the root of the blade and glue the ends together. The blade is now ready for boron.

I use 0.004” boron on by all parts of my balsa boron props. While I suspect it makes slightly stiffer blades than 0.003” boron, the main reason I use it is because I ran out of 0.003” boron and had a 200’ roll of 0.004”. I bet 0.003” would work just fine. I pre-glue the boron in a Harlan glue pot with full strength duco. I do not recommend using thinned duco for pre-gluing. I have not had problems with boron popping loose on prop outlines. My pre-glued boron usually weighs around 0.70mg/in.
Before I start adding boron, I first use little blocks to shim underneath my prop block to make the surface of my prop block horizontal. This makes gluing on the boron easier for me.
I glue the boron to the outline by thinning the boron with acetone and pushing the boron into the wood with my finger. I recommend not going haywire on the amount of acetone. This will make it hard to remove the blade from the template. I load my brush, and blotch most of the acetone away before wetting the outline and boron. I start at the root, making sure it is glued on well. Being right handed, I hold the boron in position over the outline with my left hand and use my right hand to wet the boron with acetone and press the boron into the wood. I have found that running my finger over the outline does a good job centering the boron on the wood. Do one or two inches at a time until you get towards the tip.
The tip can be tricky, but to tackle this part simply curl the boron into a circular shape that represents the radius of the tip circle as shown below. While holding the boron, LIGHTLY use acetone and press down to adhere. If you use too much acetone, the tips will come apart and this can be very frustrating.


Once you finish the tip, finish the rest of the blade normally. After the first go-around or two, it is much easier to do the outline part and it ends up being the quickest part of the build.
Before removing, mark the very tip of the blade at the center with a marker. This will be used as a centering point for the blade later.
Now after you are done with one side, you will need to flip it to do the other. A really thin razor blade like a candidas or thin X-acto will come in very handy. Very carefully slide or wedge the blade underneath the outline and also the template. Be careful not to slice right through the outline. If this does happen, continue removing the blade, and fix it off the form (or on the form if you are careful about the glue). If the outline does not pop out, use a small amount of acetone on the outline to free it, applying gentle upward pressure to the outline until it pops. Do not use too much acetone or it may pop the boron loose. This is especially important at the tip of the blade. I like to blotch my brush on the template to remove almost all the acetone before running it across the outline.
Continue this process around the outline until it is freed. Be patient, the first few blades are the hardest, but you will learn how much acetone to use, and develop your own techniques for removing the blades.

Once you remove the outline from the template, simply flip over, line up the mark at the tip, and re-pin it inplace with balsa shims. You may find that you might not need shims to hold the blade in place. It’s really up to you. I start at the tip of the blade and push it onto the template working towards the root. If the root doesn’t line up, simply adjust the position of the marker spot at the tip and try again.
Do the boron in the same way for the top side but BE CAREFUL with the acetone use. If you bring upon a flood of acetone, the boron on the bottom will often glue to the template and block and causes major frustration.
Once the top side is complete, loosen the outline from the template. No need to completely remove it, but I think it is easier to do this step now than after the ribs are in place.
For the ribs, cross section is more important than you might think. They play a key role in holding propeller twist and therefore must be moderately stiff. For my ribs, I use between 0.022-0.025” for the sheet, and cut the ribs that will be free-standing (not attached to prop spar) to a thickness of 0.030” (roughly). The rib attaching to the prop spar must be very rigid, so I cut this one to 0.040” approximately. You can experiment more with rib camber and other factors with spar less props better I think, but I usually use a 2% camber.

Attaching the ribs to the outline is straightforward, I trim the ribs until they fit in the slot and glue them with thinned duco. Make sure the ribs are glued well. For the rib attaching to the spar, apply the boron using help from the rib template held upright with masking tape. I haven’t really made a fixture to do this part better and I pretty much free-hand the boron on the rib.
To make sure stresses within the glued rib don’t distort the frame, I often soften the glue joints up several times with acetone over the course of 12 hours, and leave the frame sitting for about a day.

After about a day, remove the frame and inspect it. I often find spring-back in my blades that results in a pitch going from 26” at the root to 31” at the tip. I have a correction for this that I will discuss later, but if you find a better method with no spring back contact me!!!


After removing the blade, it’s time to attach the prop spar and then we will deal with the spring-back. Choose whatever type of spar you want, whether it be carbon, balsa/boron, or hard balsa. If you use balsa boron, I recommend wrapping the boron on the spar between the hub and the blade with a bit of Kevlar. This adds like 5mg total and saves enormous frustration later. This can also be done on the outline as well, but I haven’t really found a need to.
To attach, I glue a small standoff on the end that attaches to the rib. This gives more surface area to glue but also the standoff makes the tip of the blade line up with the spar better since it takes into account the curvature of the rib. I use duco for both the joints at the rib and at the root but reinforce the root joint with a tiny drop of CA glue. Now the blade is essentially done, and the lost twist must be put back in the blade.


To reintroduce the twist, I douse the two ribs closest to the root and the rib near the tip in some acetone to soften the joint, and using one hand to hold the spar and the other to hold the tip, gently over-exaggerate the twist and hold for a minute. Let go, line up the blade with the prop block to check your progress and keep doing this until the twist is back.
Now cover like normal and you’re done! I found covered props weigh between 180-200mg for both blades which is reasonable. The more you practice, the lighter and stiffer they will become. They fly very well and are generally stiffer than my sparred props though they are a bit heavier.

If you have any questions or comments my email is egr6b@mst.edu.
Kurt Krempetz National Championship Standard Catapult Launched Glider Click here to download a PDF of the plan.
Please take 5 minutes to fill out the linked survey regarding participation in indoor free flight activities. The goal is to capture perspectives from a wide range of levels of engagement. This survey is cross listed in several places so if you have already completed it, you do not ned to fill it out again.
Thank you!
Nick Ray
View more by category: Uncategorized (292). .