Rob Romash’s Ministick
 Click here to download a copy of Rob Romash’s plan.

Akihiro Danjo’s Ministick
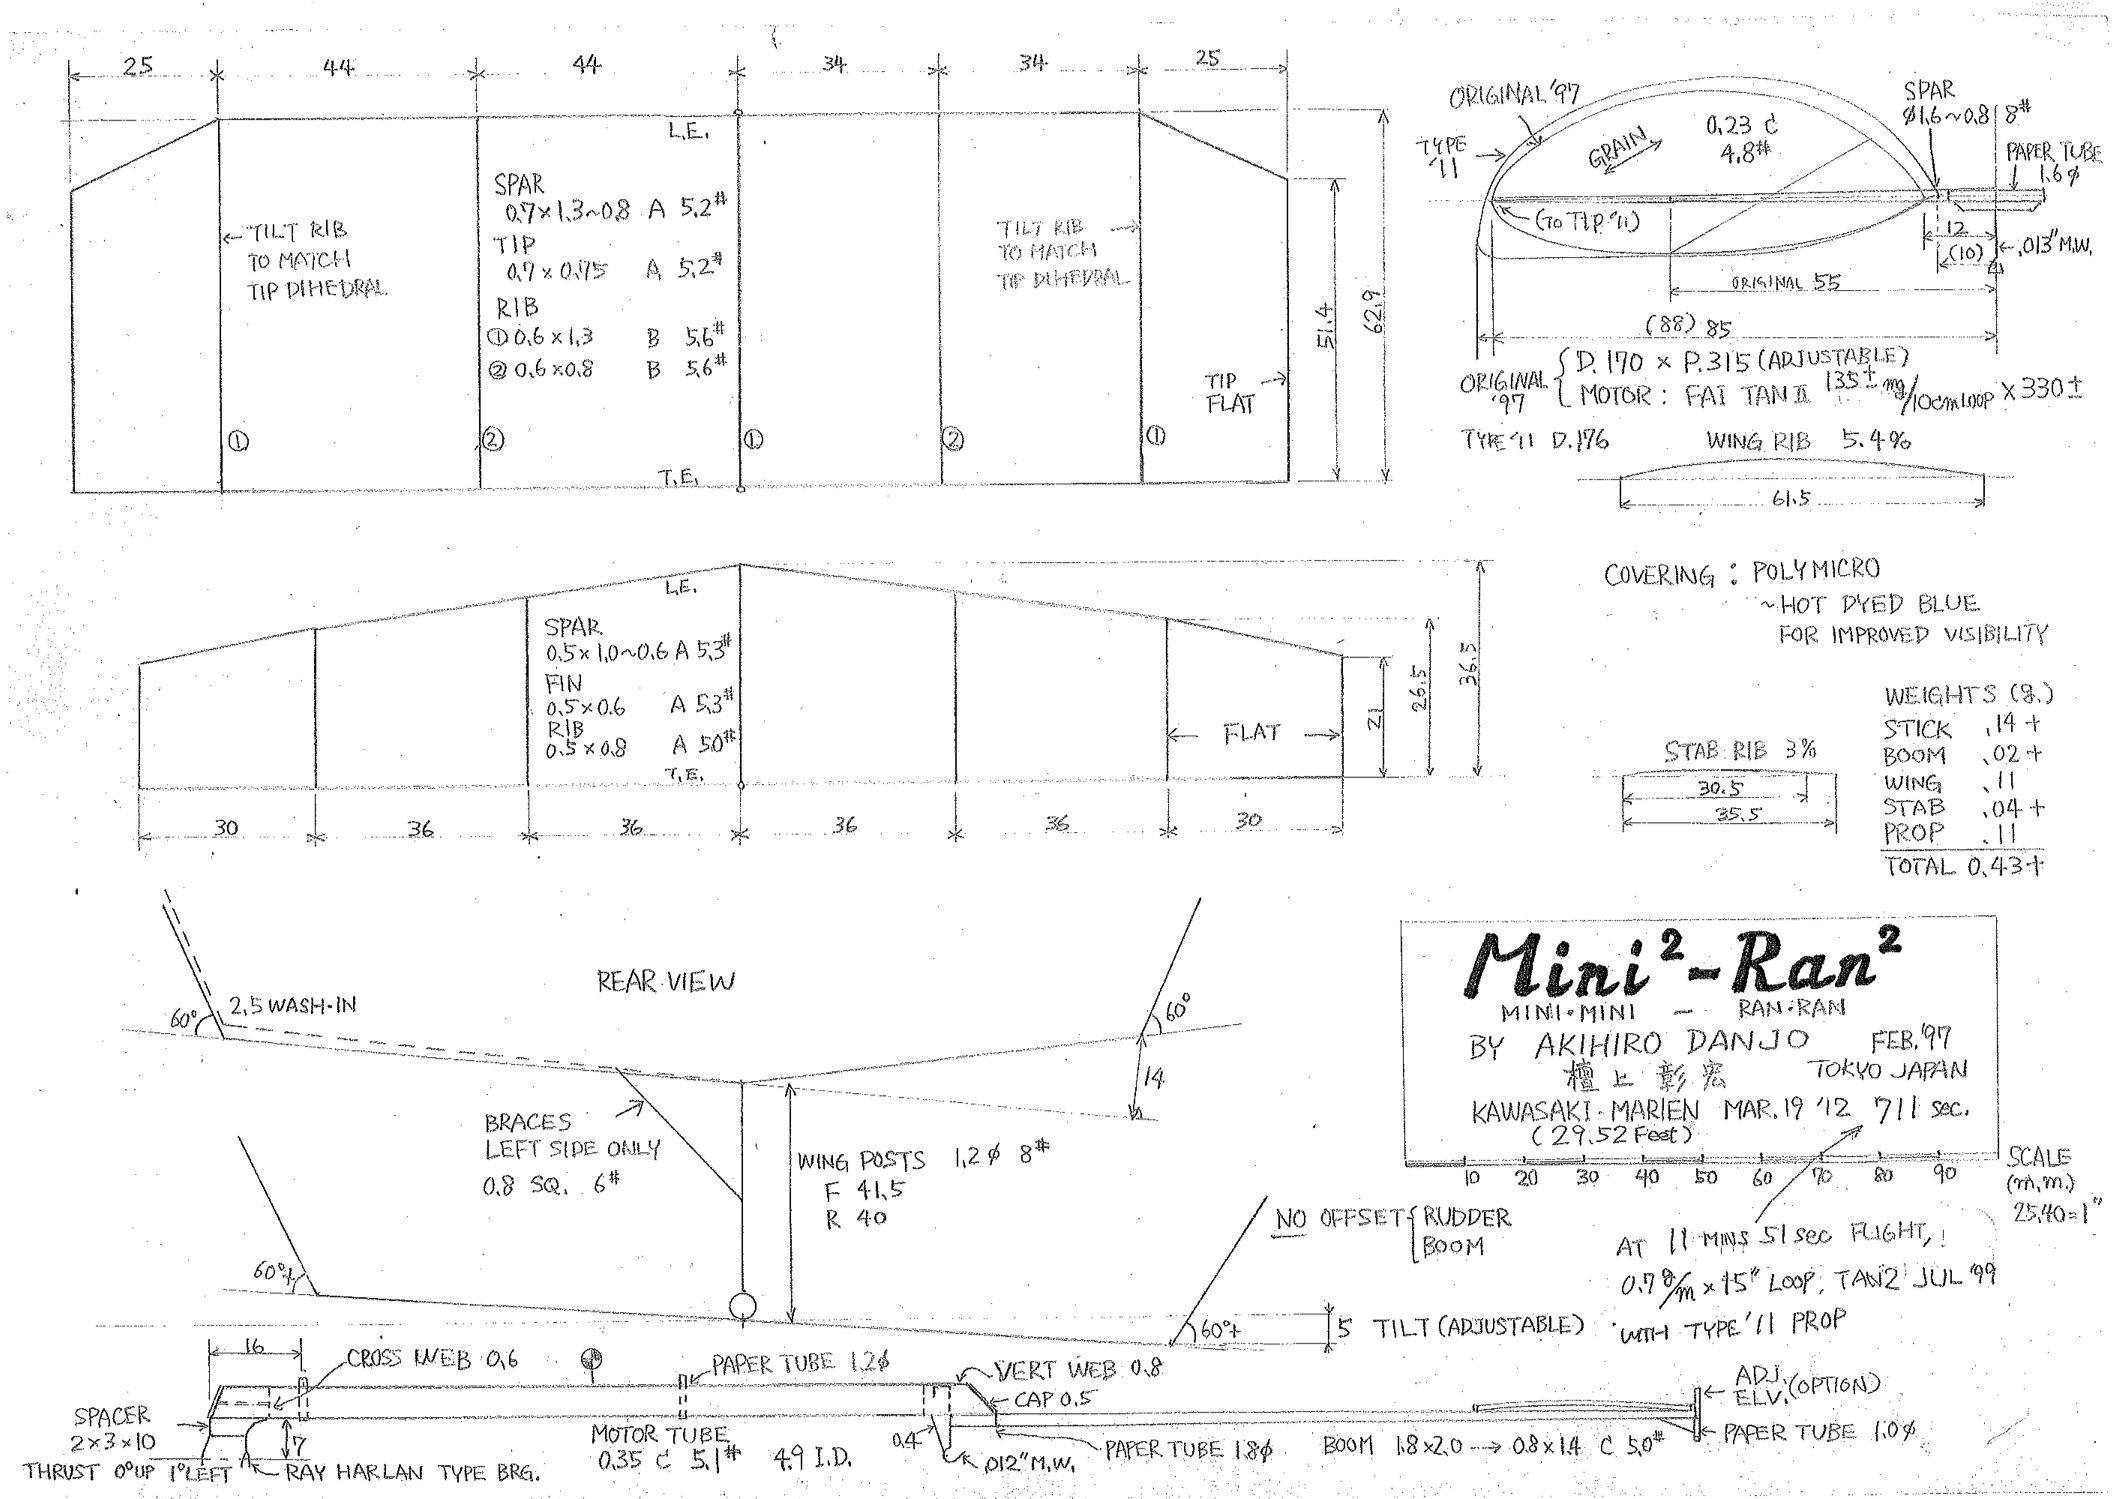 Click here to download a PDF Akihio Danjo’s plan.
Carbon Prop Outline Follow-Up
June 13, 2013
Brett Sanborn
Since publishing the carbon prop outline article, a few people have been contacting me to point out problems and concerns.
Apparently, since the article was written and published, http://www.r-g.de no longer offers Toray M60J carbon fiber. Unfortunately, there is no supplier here in the US for the fiber. Kevin Lamers pointed out that spools are available on another German composites website http://www.litronics2000.de/, though shipping to the US may be a problem.
The ProSet 145-224 epoxy system I suggested does not seem to be available from the CST composites store. I originally used a different Pro-Set epoxy that as of January 1, 2013 is no longer available (old formula 145-226). MGS epoxy has good properties, but also may be cost prohibitive. EZ-Lam 60, available from acp-composites seems to have good properties and can be cured at similar temperatures as the 145-224 of ~140º F.
Finally, there has been concern over the size of the M60J fibers being similar to asbestos fibers which can cause lung problems. In general, the body can clear away larger particulates, but smaller particulates might not be cleared as easy. While the diameter of the M60J fibers (5 µm) is much larger compared to asbestos (~0.5 µm or less), some studies have shown that fibers in this diameter range could cause similar affects as asbestos by becoming permanently lodged in the lungs. While the overall aspect ratio of the fibers also plays a role, it is rare to find asbestos fibers thicker than 1 µm in the lungs [1]. It has also been shown that fibers longer than 8 µm and of diameter smaller than 1.5 µm are the most potent cause of malignant cancers in the human respiratory system [2]. The smaller the fiber diameter, the greater number of fibers per mass unit of asbestos dust (or any small particle dusts), which increases the chance of their inhalation and penetration into deeper parts of the lungs [2]. Furthermore, studies suggest that fibers of diameter greater than 3 µm cannot penetrate air sacs in the lungs (are not respirable) [2]. Hence, it seems that M60J fibers are probably slightly larger than what can be dangerous. We also do not know what affect of coating the fibers first in epoxy followed by sanding will do to the size of the particles. This may indeed increase the size and thus reduce the likelihood that the fibers become permanently stuck in the lungs.
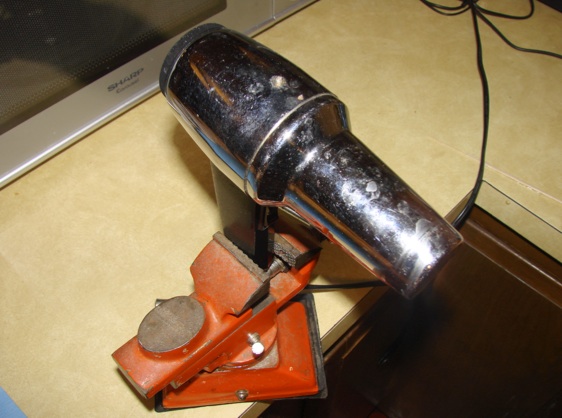
All this is to say that when dealing with the M60J fiber it is probably not a bad idea to wear a P100 particulate filter respirator, which will stop small particulates. A further step would be to construct a small particulate hood as shown in the figure below. The hood below is a Lexan box with holes on either end to which a small HEPA air filter is attached. When sanding, the filter is turned on while sanding takes place inside the box.
For an in-depth review of Sources of Asbestos and Other Mineral Fibers Present in Ambient Air, see [2].
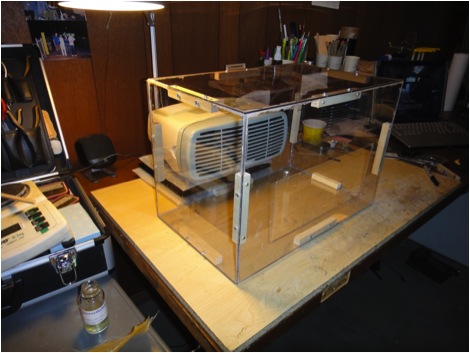
Filter setup – Polycarbonate box with hole cut in back for HEPA filter and working hole in front to provide negative pressure and airflow into the box
[1] D. Liddell, K. Miller. Mineral Fibers and Health. 1991. CRC Press.
[2] L. Wachowski, L. Domka. Sources of Asbestos and Other Mineral Fibers Present in Ambient Air. Polish Journal of Environmental Studies Vol. 9, No. 6 (2000), 443-454
Tyson Glue Bottle Mods
Steve Fujikawa
steve_fujikawa (at) verizon.net

Applying clear silicone around the top of the bottle slows evaporation.
Dennis Tyson’s glue bottles are great, but if you’re like me you’ve had a couple of problems with them. First, the acetone evaporates from the bottle before you’ve used it all, necessitating an annoying clean out job. Second, the supplied polyethylene nozzle develops leaks from the acetone. I’ve found a solution to both of these.
First, apply clear silicone sealer around the cap, aluminum tube, nozzle, and especially the wire and it’s hole as shown in the photo. This slows evaporation to virtually zero. Apply the silicone with everything fully assembled and let harden thoroughly. The wire can be carefully pulled free while leaving a tight seal around it and the hole. Since doing this I’ve never had the glue harden in the bottle or the nozzle, even after several weeks. You can even pull the cap off to add more glue without replacing the silicone.
The nozzle can be replaced with the Sig CA applicator tip shown below. You will need to cut both ends to get a tight fit around the wire and the aluminum tube. Do this a little at a time so you don’t waste more than one tip like I did! The Sig nozzle seems impervious to acetone and never develops a leak.
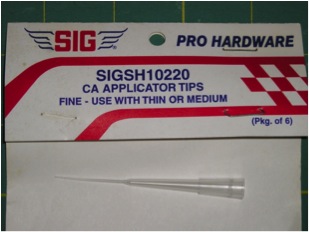
Replace the polyethylene nozzle with Sig CA applicator tip.
Another more minor issue that I’ve noticed is that the wire corrodes from either the glue or the acetone. After a while the oxide can contaminate the glue. I’m not a chemist so I’m not sure why this happens, maybe the glue is hygroscopic? But I suspect the problem could be solved by using stainless wire. I need to order some soon to make pushrods for a DLG so I’ll try it out.
Lakehurst Memorial Day Flying Report
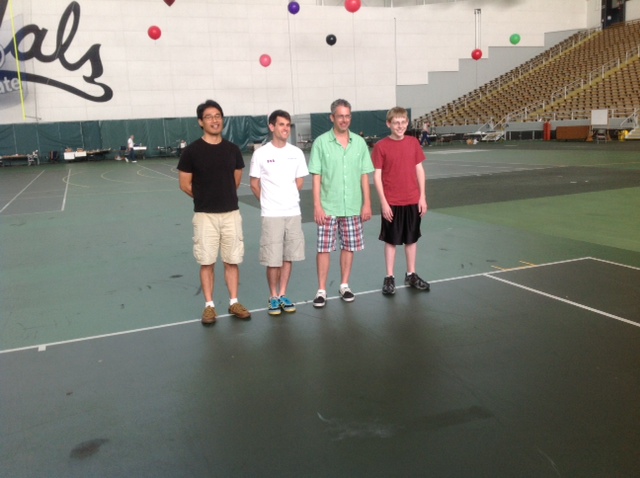
Brett Sanborn
May 28, 2013
Normally this time of year, everyone would be gathered at USIC in Johnson City, Tn. However, since new banners and things will be hung from the girders, the indoor community was unable to return to Johnson City for the NATS. The indoor NATS will be held in Champaign, IL from August 7-10th in the 98 ft tall (Cat III) armory. USIC at Johnson City would have provided a good practice session for the upcoming USA F1D team selection contest being held at the Kibbie Dome in late June, but due to the unavailability of the mini dome, Lakehurst was the only option for John Kagan, Kang Lee, and myself. Had we been in Johnson City last week, we would have enjoyed temperatures in the low to mid 80’s and lunchtime cuisines ranging from Thai food to Pal’s Hotdogs. This was not the case for the final high-ceiling practice session at Lakehurst last weekend, given the variable weather conditions, Wawa sandwiches, and chips and salsa.
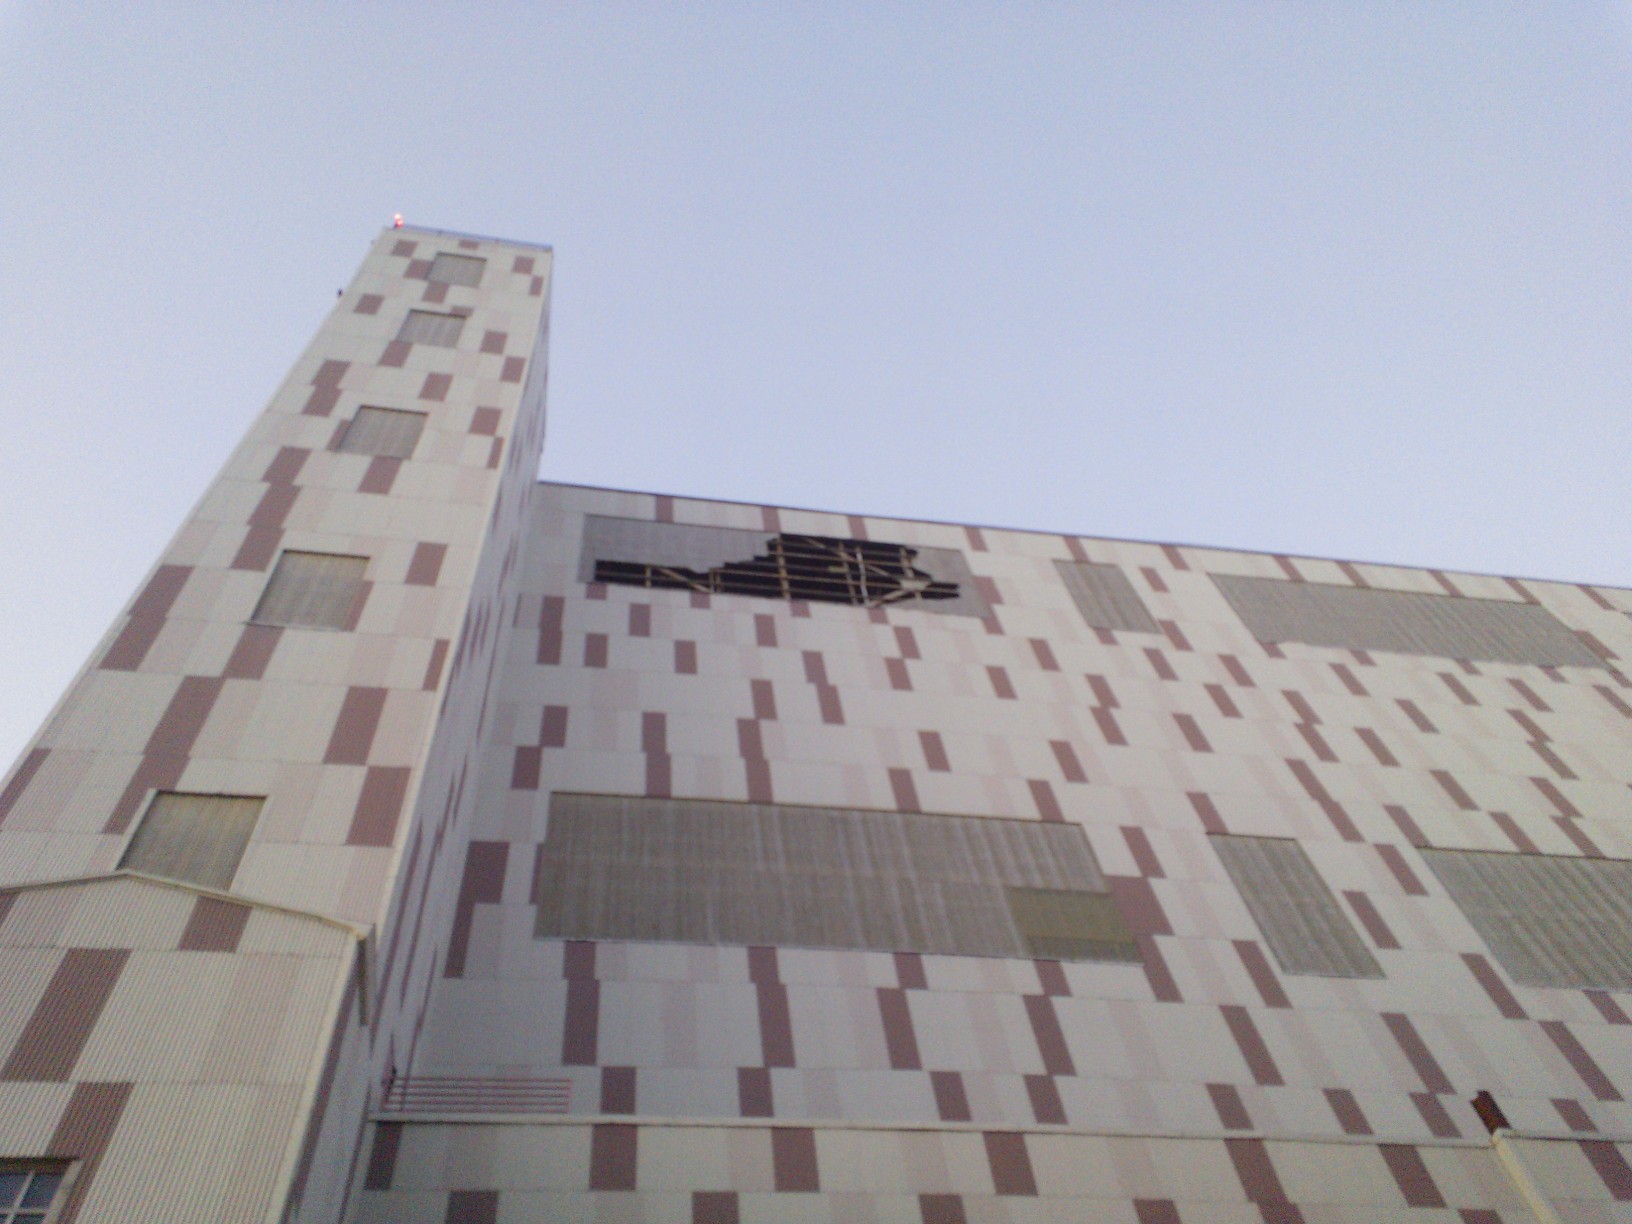
Saturday was cold and windy. The temperatures inside the hangar were in the upper 50’s with winds outside in the 20-25 mph range. Luckily I brought two coats and my green ski cap to keep warm throughout the day. Max Zaluska joined us in the afternoon only to hang out, not wanting to risk his recently repaired handlaunch stick in the windy conditions. The hangar was apparently damaged as a result of hurricane Sandy. Fiberglass panels that serve as windows for the hangar were blown off leaving a gaping a hole 40 by 15 feet in size located at the end of the hangar above the club locker (see photo). Though the base reported damage to hangars 5 and 6 after the hurricane, there was no photos of the window damage in any of the 1,589 photos of the damage and recovery effort on the McGuire-Dix-Lakehurst official photo stream. The East Coast Indoor Modelers (ECIM) president Horace Hagen said that folks at the base do not currently have the money to repair the damage. ECIM might put forth a portion of their yearly donation to the Joint Base toward repair of the damage though the total expense is still unknown. We will update the indoor community as information becomes available.
Not wanting to get F1Ds out due to the high winds, John Kagan rummaged through some buckets located in the club locker and found two recovered ministicks and a limited pennyplane that had “Underdog #1” written on the motorstick. After some quick repairs, I was able to squeeze an 8:23 out of the ministick. Kagan had an even more exciting flight with the Underdog. After Kagan launched the Underdog at the middle of the hangar, the model climbed to about 150 feet and then drifted the entire length of the building toward the end with the hole. Now circling at about 170 feet, the plane began to rapidly sink. In about 20 seconds, the model descended to about 80-90 feet above the floor. After circling there for another 20 seconds, the model ascended back to the ceiling over the course of about 30 seconds. After the second ascent, the elevator ride was over for the Underdog. The Underdog cruised in for a cool 13:56 flight time—quite exceptional for a beat-up plane that had possibly the wildest ride of any indoor model in the history of Lakehurst.
Sunday proved to be a bit better though the winds were still in the 20 mph range. Kang was able to fly his primary F1D for a two-part flight of about 33 minutes (he restarted the stopwatch after retrieving his F1D from a hang-up). Kagan was doing consistent 9:00 quarter motors with various F1Ds and I did an 18:54 half motor before packing up for the day at around 8:00 pm.
The lower winds and higher temperatures on Monday afforded more flying time. We flew quarter and half motors for most of the day until the air got squirrelly around 7 pm. In one instance, Kang and I both launched at about the same time and both drifted half the length of the building (away from the hole) and spend the entire flight steering back to the carrier deck; Kagan later followed in suit. All in all it was a useful weekend for preparing for the upcoming team selection contest. Kang, Kagan, and I tried to wring out models to get them to climb and fly consistently; trimming propellers out for the Kibbie Dome at Lakehurst would prove to be a fruitless pursuit—any adjustments made at Lakehurst would have to be readjusted at Kibbie.
We do not yet know how the hole near the roof will affect flying in the hangar. We saw higher winds on Sunday, yet the conditions inside the building were a little better than lower wind conditions on Monday. Ultimately it will probably depend on the wind direction and intensity. Hopefully the hole in the building will get fixed by the Joint Base soon.
Cezar Banks
It is with great sadness that I must announce the passing of Cezar Banks. Jim Richmond told me he had received a card from Cezar’s daughter Deena. It said Cezar had been suffering with alzheimer’s for years. She said a celebration of life memorial luncheon to welcome friends is planned for Saturday May 25. Contact deenabanks(at)hotmail.com if interested. (Change (at) to @ to get the email address to work)
Steven Brown and Jim Richmond kindly shared some of their memories of Cezar.
Cezar Banks
I had never flown an indoor model when I met Cezar Banks in 1983 at Santa Ana. I didn’t know that first day that the people flying microfilm models were some of the best F1d flyers in the world: Banks, Bob Randolph, and Erv Rodemsky. I quickly found out that Cezar was the best flyer on the West Coast.
Cezar had a commanding, patrician air. Chatting with him could result in the intimidating feeling that you were being examined and didn’t quite make the grade.
Like many beginners, I built one of his pennyplanes. When he saw that you would put in the work he opened up more. If you listened and followed his advice, your times improved. He became a mentor to me.
Ten years later, as members of the U.S. F1d Team, Cezar, Bob Randolph and I flew in the World Champs at the Salt Mine in Romania. It’s easy to become distracted by the mine, but I remember his practice day direction to the rest of us: We came here to fly, not to talk. Concentrate.
It’s obvious how influential his designs were. His Le Ordinaire II of 1984 was the prototype for much of the West Coast F1d development for the next 15 years. In response to Jim Richmond’s victory in Nagoya in 1984 using a variable diameter propeller, Cezar debuted his variable pitch propeller in 1988. That VP mechanism is still competitive today. He made variable pitch propellers practical. They did more to improve our results than any other design feature of the 80’s and 90’s.
By the mid-2000’s Cezar was coaching Science Olympiad. His Leading Edge SO design was kitted by Peck Polymers. I can recall his late evening phone calls reporting on his work on these seemingly simple models.
Cezar was an electrical engineer for IBM and General Dynamics. In his later years he would proudly recall his experience in the Mercury space program. Doing the voices of both the interviewer and himself, he would recount how at the time of John Glenn’s first flight he had been interviewed on national TV to reassure the public about the safety of the Mercury capsule’s escape system.
It’s not only for his VP prop or his many trips to the podium at World Champs that I will remember Cezar. It’s for his knowledge and dedication and his will to fight at every contest. It’s for his advice and his friendship. Every time I hold a model in my hands, ready to launch, I’m reminded of him, of those times, and of the effect he had on my life.
Steve Brown
CEZAR BANKS 1926 – 2013
Cezar was a good friend and fellow team mate during many world indoor competitions. His F1D abilities were developed along with several other southern California flyers who frequently practiced in the Tustin hangar. These abilities became apparent when he placed second at Nagoya in 1984.
Cesar was born in Kenosha WI in 1926 and started modeling in 1935. He did 2 years in the Navy (1944-1946) then earned his BSEE degree at the university of Wisconsin in 1950. Family and career then took precedence and he retired from General Dynamics after 33 years as an engineering supervisor. As a side note, his pre F1D history is remarkably similar to my own.
He said he first tried for the F1D team in 1979 but finished dead last. Then he made the team the next 8 times in a row (1981-1995). During this run as a US team member he managed to win 6 silver medals and one bronze.
Cezar’s other notable modeling achievements for which he was awarded plane-of-the-year recognition were (1) for his 25 year old one and only ltd. penny plane which had become quite popular, (2) for his 1986 F1D “Le Ordinaire”, and (3) in 1999 for his variable pitch mechanism design. He was inducted into the Free Flight Hall of Fame in 2000.
Cezar had an acting sideline which I believe he enjoyed (this was southern California, after all). He said he was often chosen to play the part of a villain such as Sherlock Holmes’ nemesis Moriarity.
Cezar had a dry sense of humor that will be missed. About the 1986 world championship in Cardington, England (which was held with hurricane Charley raging outside) he said “it was cold, windy, and rainy and the weather was bad outside too”.
Jim Richmond
Cezar’s Le Ordinaire II, asreference by Steve Brown

Click here to download a PDF of the plan.
Larry Cailliau’s 2006 World Championship Salt Mine F1D
My first trip to the Salt Mine was a real learning experience. The challenges the salt mine offers are much different from what we in the US are accustomed to. The first would be the cold and very humid conditions. The second would be trying to get the model to climb over 200ft. The third would be trying to fly in the dark.
After returning home I set out to develop a model that would be competitive in lower ceilings yet capable of conquering the salt mine. My old braced wings gave out to the newer unbraced wings because the braced wings wanted to fly straight under max torque. Many competitors had problems with their models stalling out at about 60-80ft. I contributed this to the models being vectored almost straight up at a high speed and very high torque. When the power burst diminished, the motor stick would straighten out causing more negative incidence in the stab causing the model to eventually stall. Because of this, I made stiffer motor sticks. The humidity made my stabs floppy and again under high speed a floppy stab is detrimental to stability. I changed my stab plan form to a more elliptical shape, thinking it would have fewer tendencies to twist. I also increased the root of the spar from .045” to .050”. These were my major design changes.
The summer of 2006 was spent trimming five models for the salt mines. I remember Jim Richmond telling me that I needed to climb about 75ft. on a quarter motor, which would be equivalent to salt mine conditions. At Champaign, I tried for two days experimenting with different props and trim setups. However, I was unable to achieve this. I again consulted Jim and he told me that a 19” 29p prop would get me up. When the all-time world’s best speaks, I listen!
When Johnson City came, I was equipped with my new props and had spent three days of quarter motor testing. Sure enough, all five planes climbed to 75ft. Minor trim changes were made. I found that my models flew best for ultra-high ceilings with 0 stab incidence and about 1/8” positive incidence in the wing. This was opposite to my low ceiling setup.
Day 1 in the salt mine was very disappointing. It was testing day and I could not get my quarter motors high enough. I was only getting about 7 1/2 minutes. After working all day it was time to quit. I was tired and disgusted. In the middle of the night it came to me, that I was using sport rubber ¼ motors which I made for initial testing because it was hard to break. The guys laughed, and eventually I myself thought this was kind of comical. The following morning I was eager to get some 5/99 on the model to see if this was truly the problem. Alas, things were looking up, proper altitude and 9 minutes plus.
Round one of the competition came and no one wanted to fly first. I volunteered. The flight could not have gone better, cruising just below the ceiling and staying centered the whole flight, touching down at 35:14. Little did we know that this would hold up to be the contests best flight!
Round two appeared to be going good with the model centered at the ceiling again. But Oh no, it started drifting to the side and was following the same pattern as John Kagan’s previous flight over the catwalks. Team manager, Ray Harlan, suggested that I attempt to steer it. It was a risky but necessary situation. The model was barely visible but somehow it flew onto the line. I was able to guide it back to the center. Getting it off of the line was even a bigger problem because the balloon was hiding the light on the airplane. It was just too dark. I made a guess at what angle to pull the line from the model and quickly moved away while asking everyone if it was off of the line. What luck! With the model now centered perfectly, the flight continued undaunted, and landed at 35:08, good enough for the win.

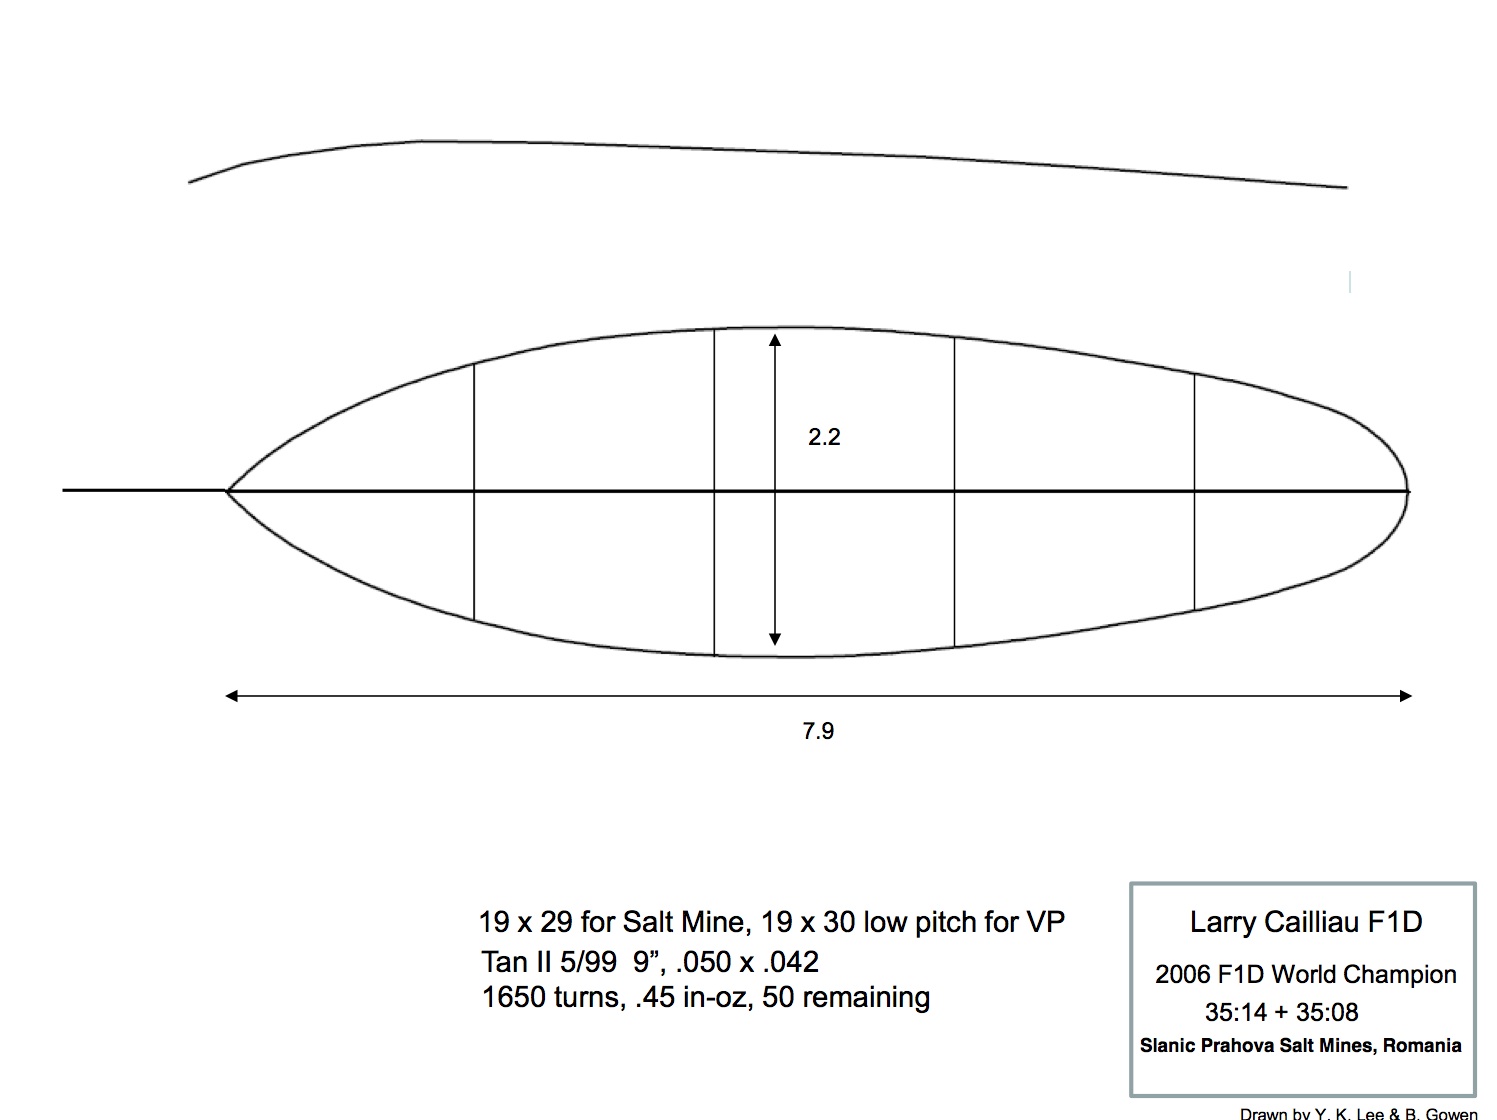
Click here to download a PDF of the plan.
Curving Balsa Strips With Heat
Beginner’s Corner

#1 Curling Iron with ¾” barrel
#2 Mono coat heat gun

I have been doing a little experimenting on an easy way to form balsa around a tight curved outline. I used a hair curling iron mounted in a small table vice or you can duck tape the handle to a table. The barrel must extend past the end of the table, and set it on its highest temperature. When a drop of water sizzles, it’s ready. To practice, take a sheet of .025.-.030 balsa, 4-5# and strip several square pieces. Make up a balsa template of the outline and pin it to a building board. Lay several pieces of the stripped wood on a counter top and puddle water on each side of the strips and let them soak for about five minutes or less. At the half way point of the balsa strip, lay it over the curling iron and pull down on each leg so that it forms a ninety degree bend. You will be able to hear the wood sizzle for a second and let it remain on the iron for about five seconds. You can roll the wood back and forth to make a larger arc or use another heating device that has a larger diameter. Use the heat gun with extreme caution and do not move your hand in front of the nozzle while it is on. As soon as the wood is removed from the iron, move it over to the template and trap it against the template using pins and small balsa wedges.
Larry Coslick
View more by category: Uncategorized (292). .