Archive for the ‘Uncategorized’ Category

Statuses

The Un-Winder

In Uncategorized on March 13, 2013 by propblocks

The Un-Winder

.

After a decent flying session, I e-mailed Kang Lee. He e-mails me back, tells me I am doing great, but wants some more data. How many turns remaining at the end of each flight?

Me: I don’t know.

Kang: Not sure it is all printable here, but the gist of it was that I was a lazy guy and that I needed to start recording that info as it will be important later.

I understood what he was saying. I could see the merit. There is just one problem. Me. There is no way I could see myself consistently unloading an F1D motor, hooking up my winder and counting backwards. Kang called it right: I’m too lazy.

This is what I confessed to Art Holtzman when I asked him to make me a doo-hickey, as I called it then.

Tell me what you want, he says.

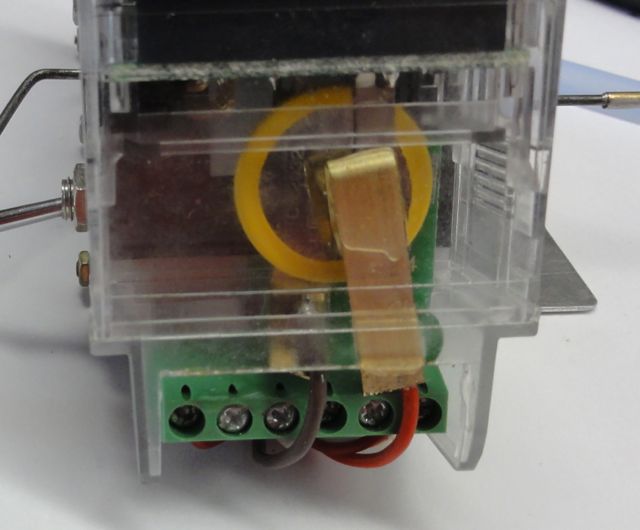
I want half a winder. No handle. No chain. Just a counter and hook, something I can hook my rubber up to and have it give me the number of turns left.

Art: Can’t you just take the motor off and hook it up to the winder and turn the crank backwards like all the rest of the guys do it?

Mike: I think I just explained this. I’m too lazy to do that. I know myself.

Art: Give me a bit.

Understand that this is a Friday afternoon. An hour or two later, pictures of this device start to appear in my inbox. A bit later a fully built unit is being packaged up, some money is exchanged, and on Monday evening, it is sitting at my door.

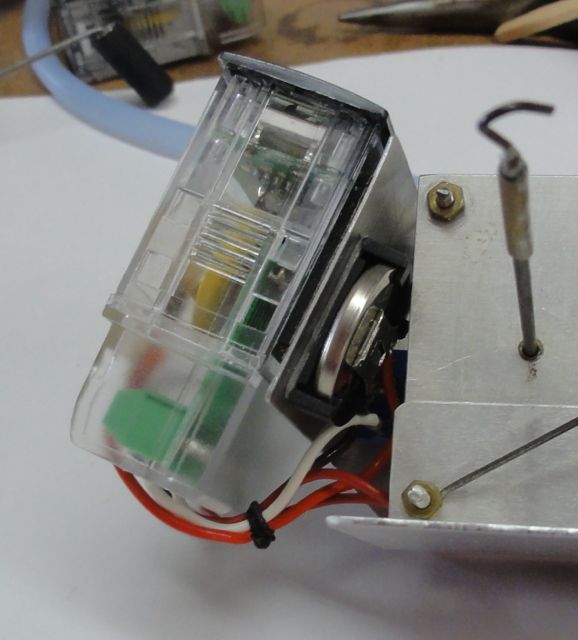
The one of a kind Un-Winder!

The one of a kind Un-Winder!

The last couple of weeks I have had a lot of practice with this, what I dubbed ‘the Un-winder’, at the EAA contest and later at Racine Memorial Hall.

Now I can walk my model to my table, unhook the motor, attach it to the Un-Winder and get a count of how many turns remain. Easy as pie. Just apply some finger pressure to the motor if a lot of turns remain to slow the unwinding down – No brake or anything special is needed.

Note: I also own one of Art’s winders and love it – Art urged me to swap the larger counter from my early winder to the Un-Winder. The newer counter picture is shown on my winder picture below.

Art's Chaingain winder with the new smaller counter.

Art’s Chaingain winder with the new smaller counter.

Please contact Art for more information. Art Holtzman [upwind120@gmail.com]

Regards.
Mike Kirda

Statuses

Propblocks.com – A source for custom-cut prop blocks

In Uncategorized on March 13, 2013 by propblocks

PropBlocks.com

.

When I first got back into indoor, I started carving a new prop block. Several hours later, half finished and discouraged, I stopped and did a web search and found an article describing a fixture for a bandsaw that seemed quite promising.

It took a lot of calling around to find someone with some old 1/8″ blade 6 teeth per inch stock. It must still be made, but it hasn’t been in the pipeline for years. I had them weld one up and send it to me. The fixture itself was pretty simple, using old on-hand 3/4″ nominal plywood, some screws, aluminum channel and a thick hardwood dowel. A lever arm rides up an angle and the angle defines the helical pitch.

After cutting a few for myself, I brought some to an indoor flying session. Requests for more follow.

This past year I decided to make them available more widely, so I opened a website: propblocks.com

I have since rebuilt the fixture a couple of times to increase the accuracy on it.

I offer blocks in both Poplar and Balsa. Normally blocks are 2.5″ wide and 2.25″ tall – wide enough for most outlines for indoor. I can make them wider within the limits of the fixture. Blocks are normally cut to 10″, but I can offer 8″ or 12″ blocks, maybe slightly longer.

Please check out the website.  I hope it will be interesting to you.

Regards.

Mike Kirda

Statuses

An Alternative Design of Kang Lee’s Carbon VP

In Uncategorized on March 10, 2013 by nicholasandrewray

Kang's Alternative VP

Kang Alt1Kang Alt 2If you would like to download a PDF of Kang’s CAD drawing click here.

~Kang Lee

Editorial Note: Kang sent this design in as an alternative to his first hub. Both hubs are still in the design stage and he welcomes your feedback.

Statuses

Kang Lee’s All Carbon VP

In Uncategorized on March 6, 2013 by nicholasandrewray

Kang Lee’s All Carbon VP
Kang1

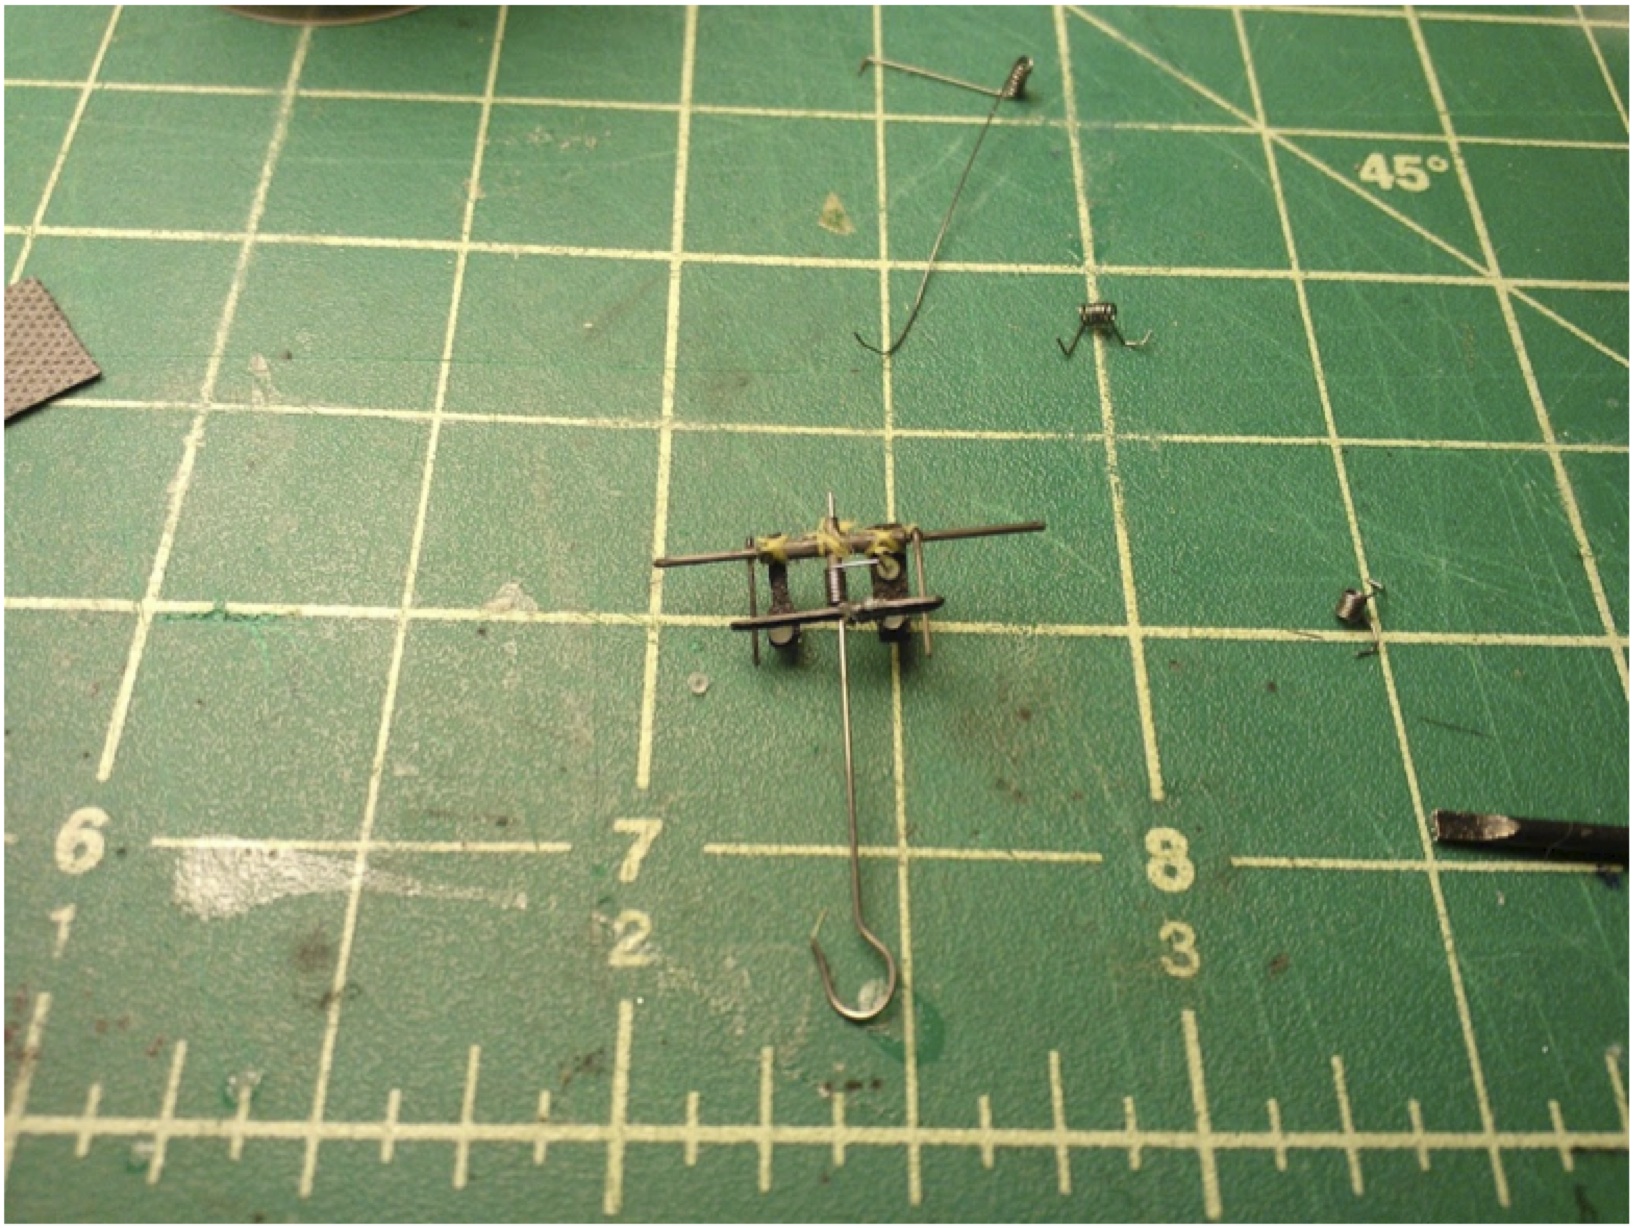
Back view of VP hub.

All joints are glued using thin CA.  Kevlar is used to secure the hub to shaft sleeve joint, as well as the screw holders to hub joint.

Spring is 9.5 turns of .008” music wire formed over a .025” mandrel.  Here, prop shaft is .013” music wire.

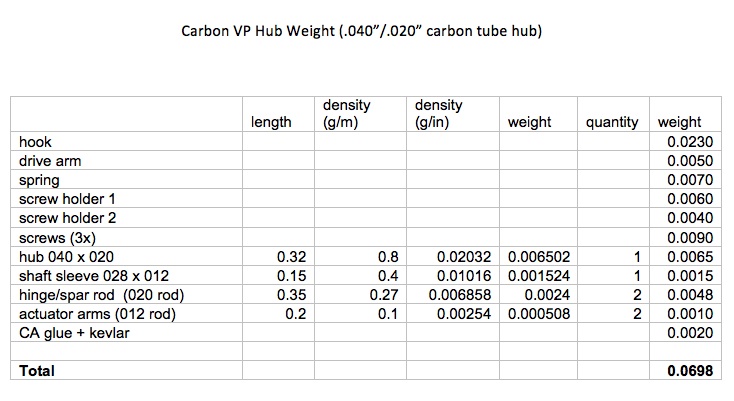
See diagrams for the dimensions of hub components.   All carbon components are off-the-shelf, affordable, and fairly easy to work with.

The VP hub as shown weighs 70 mg.  The hub is both stiff and light and can probably survive exploding motors.

There is some binding between the rod and the tube.   I can hear the VP pop into low pitch.   One solution may be the use of graphite lubricant.

Your feedback is welcome.

Kang2

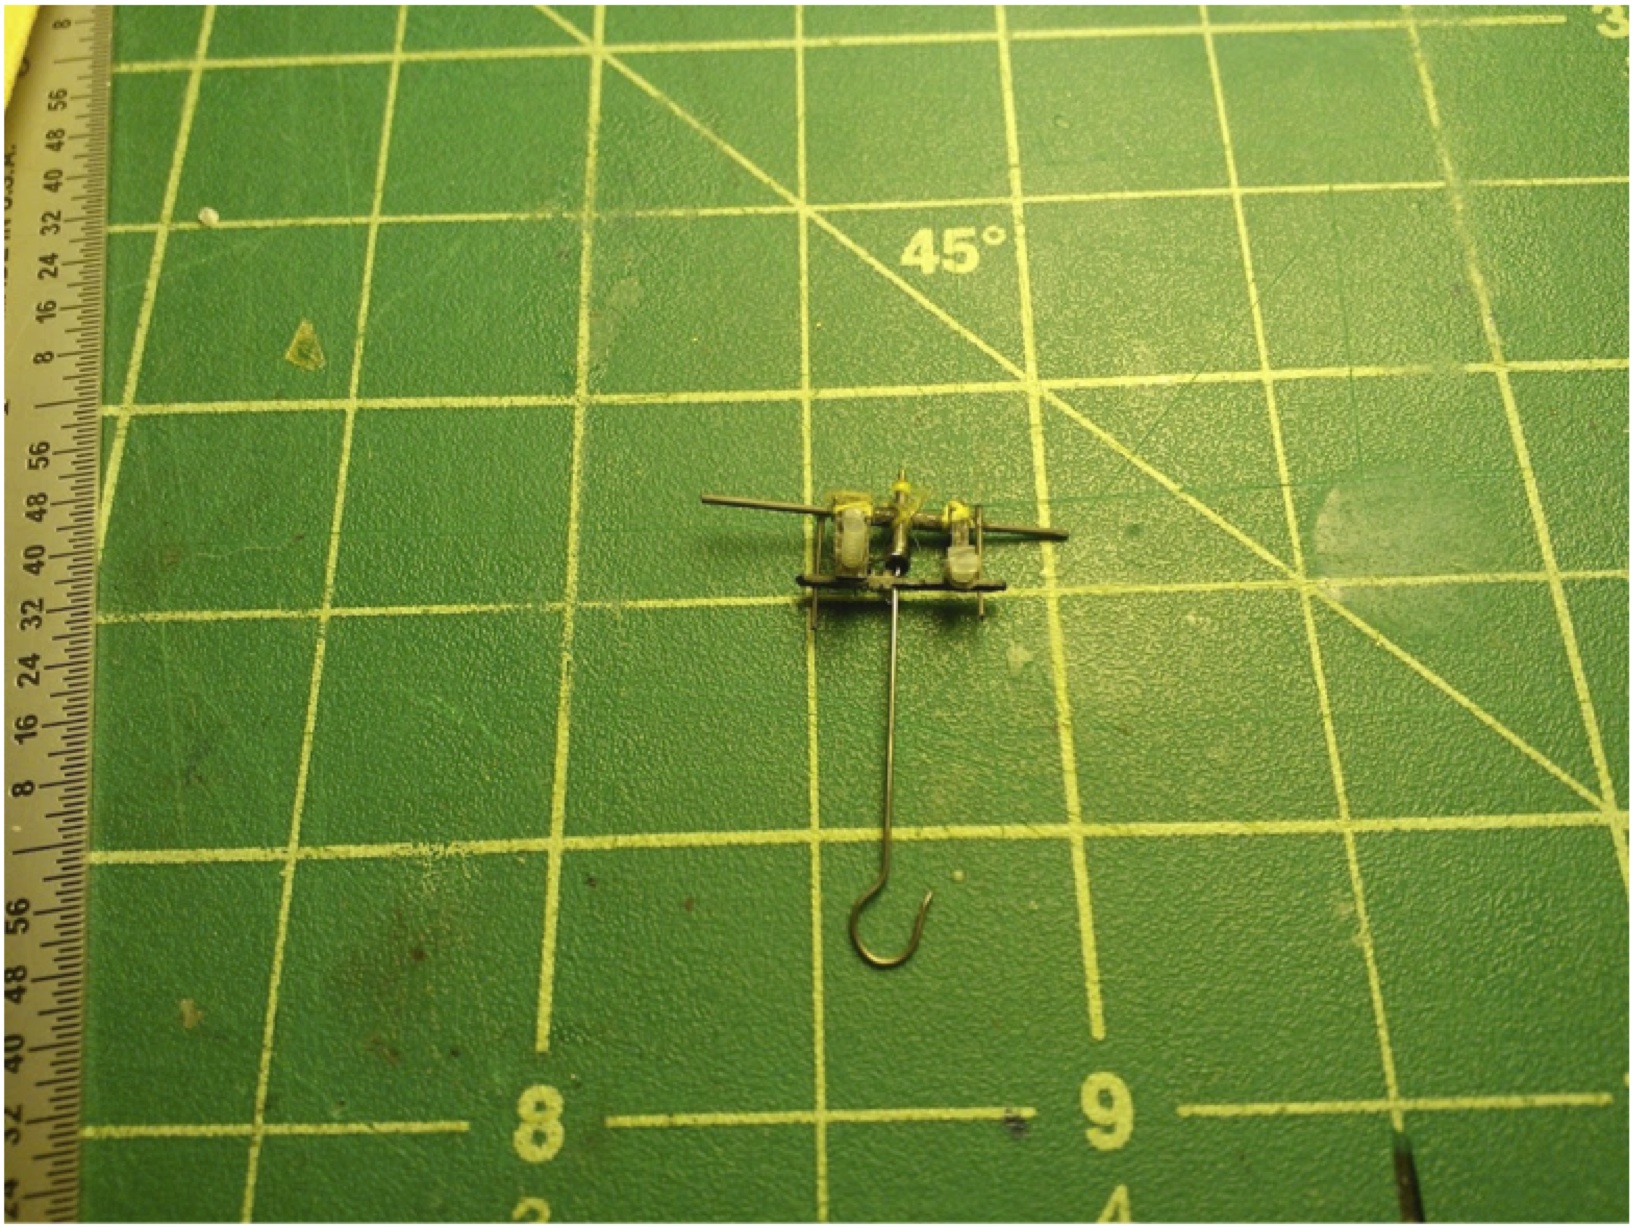
Front side of the hub.  Here, a spring wound using a .031” mandrel is shown.  The spring doesn’t seat well over the .028” OD carbon tube “shaft sleeve”.

Kang3

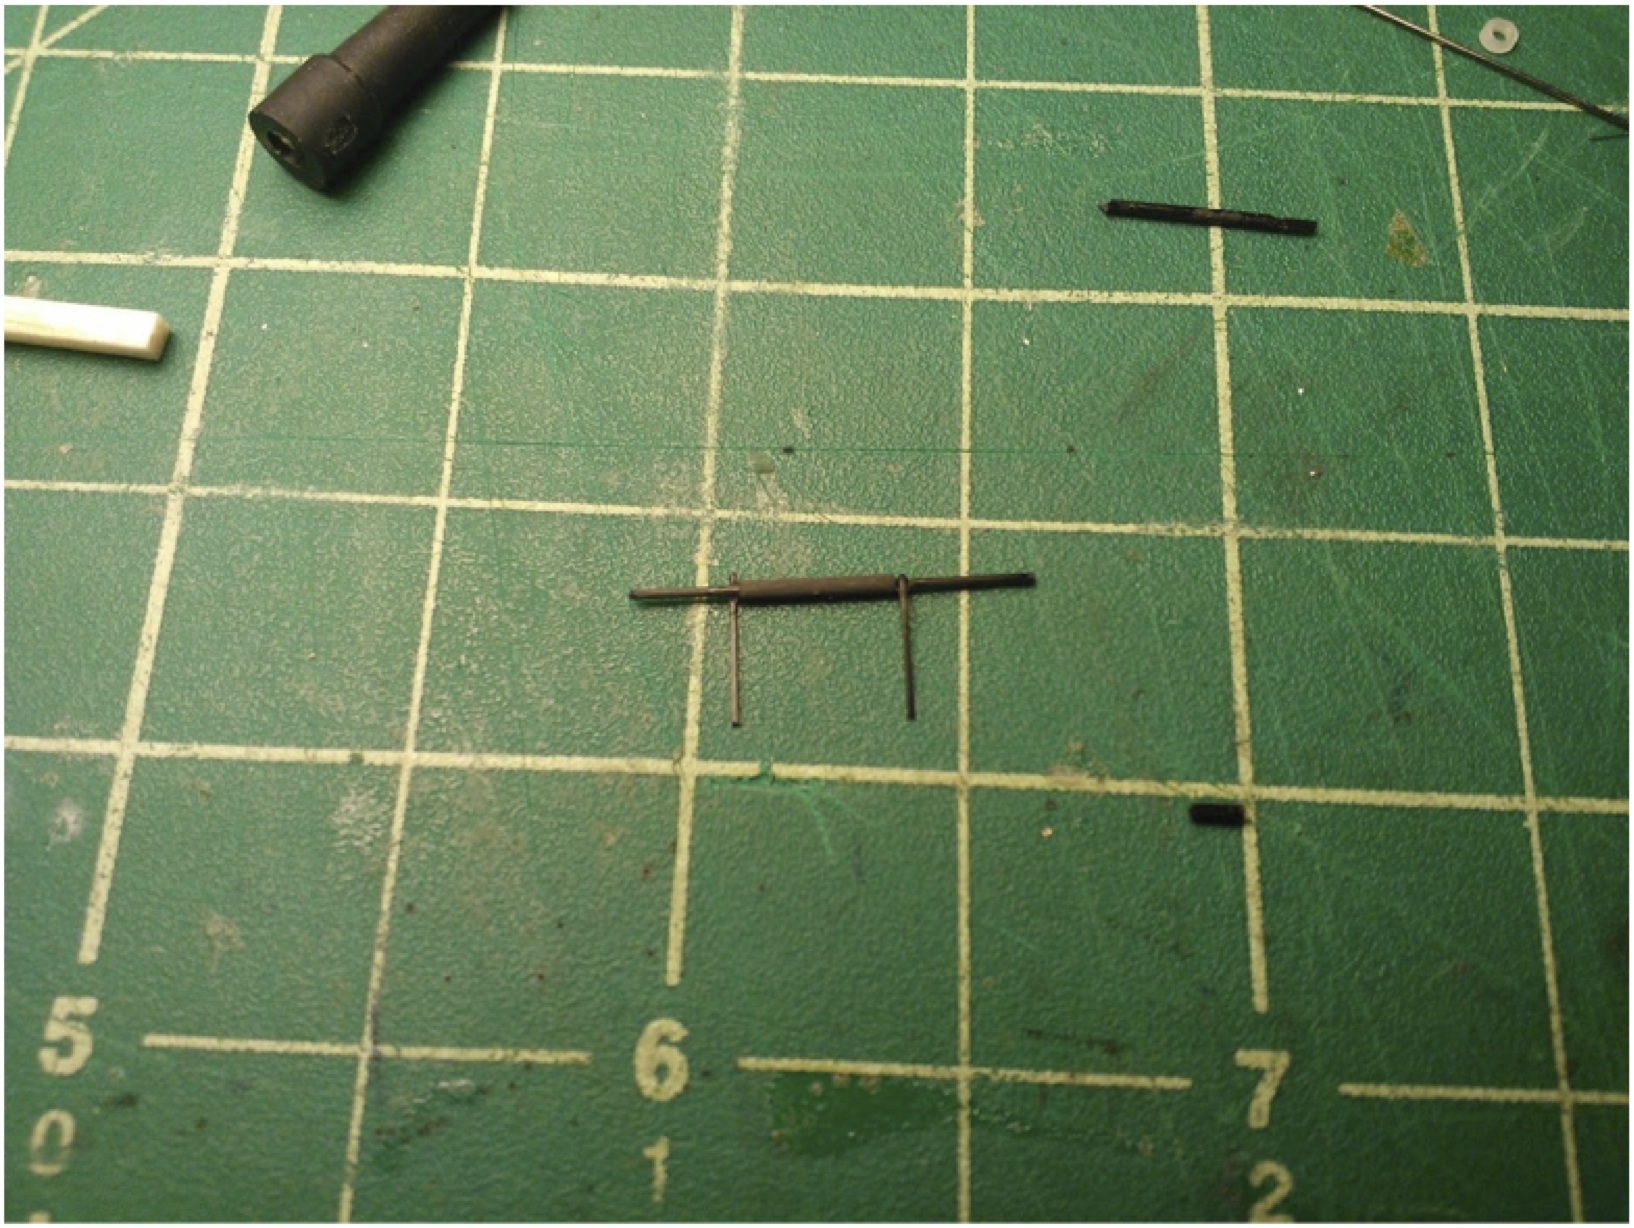
Carbon tube “hub” before prop shaft sleeve hole is drilled.  The lever arm is glued to the spar “rod” using thin CA.  Only tack gluing is needed.  The lever arm is later securely glued to the end of the prop spar.

Kang4

Kang5


Please click here if you would like do download a PDF of Kang Lee’s CAD drawings

Statuses

Bill Gowen’s 2013 Science Olympiad Glider

In Uncategorized on February 21, 2013 by nicholasandrewray

WIF-SO

Click here to download a PDF of the plan.

Statuses

Ben Saks’ Float Is In Postproduction.

In Uncategorized on February 13, 2013 by nicholasandrewray

Ben Saks’ Float Is In Postproduction

The article below is copied from an update that went out to their backers on February 7th.

“We appreciate all of your continued support, and apologize for the long time we have taken to post this update. There has been a lot of speculation about what’s going on with Float. We hope this update will answer your questions.

KIT STATUS and BACKER REWARDS: Kits will start shipping in March, with the Ministick and Penny Plane Kits shipping first, followed by the F1D Kits. We will also be posting the video tutorials in March. These videos will be instructables focusing on how to properly build, trim and fly the planes. Please look for emails and messages asking for your shipping address. I will be sending these requests out in the next week. The non Kit rewards will be mailed or available upon the completion of the film.

FILM STATUS: After the successful completion of our fundraising efforts we carried out the final production tasks needed to complete the filming of Float. Our production team travelled from New York to England, Japan, Romania and Serbia in July and August 2012 to film on location and to cover the World Championships of F1D.

We have now collected over 8 terabytes of footage over the course of three years. This amount of footage is not easy to work with, however we have captured many great moments.  Filmed on location in Argentina, England, Japan, Serbia and Romania, Float will truly represent the international competition of F1D. We interviewed many of the most important individuals in the hobby, and captured the entire 2 year F1D World Championship cycle from start to finish.

Despite out best efforts we are unable to release the film as scheduled in February 2013, however we are on schedule to submit the film to festivals in September of 2013. We are working with a post production company to assist in the remaining professional services needed. This includes editing, sound design and music supervision, and voice-over narration.We will post continual updates about the status of the film throughout this post-production process. We will also be posting an updated trailer for the documentary. All of our efforts will focus on completing and releasing the film in 2013.

We honestly appreciate all of your continued support, and apologize for the long time we have taken to update our backers. Float is a passion project for us. We have come this far and are very close to getting this project finished. However we also have other real-life responsibilities which could not take a back seat over the last few months. With that being said, we are pushing full-steam-ahead to complete Float!

Here are some photos from our journey. This is just a taste of things to come!”

image-209540-full

image-209541-full

image-209542-full

image-209543-full

image-209544-full

image-209552-full

image-209559-full

image-209556-full

image-209555-full

image-209565-full

image-209560-full

image-209561-full

image-209554-full

Statuses

A Backup Battery For The Chain Gang Winder

In Uncategorized on February 12, 2013 by nicholasandrewray

A Backup Battery For The Chain Gang Winder

Ever since I started to use the Trumeter 7111 counter in the Chain Gang Winders, I’ve been bothered by the fact that the battery wasn’t replaceable. Using a new $40 counter every 8 or 10 years isn’t a problem in an industrial application, but this is a hobby. It’s not a problem for me personally, as I’m 77 now, and what are my chances of outlasting the battery? But for young kids like Finn and Kang, it’s a repetitive expense that isn’t fair. Even worse, the most recent customer is only 13, and given a normal lifespan, and if she stays in the hobby, she’s looking at an expense of better (worse?) than $250 over the years. This is unacceptable.

So, using what I had in the stash, I came up with a cheap, fast, sorta neat solution. You can do it too if you’re so inclined.
Here’s pics…
.015 x .250 from the K&S rack at the LHS. 6" lengths of servo wire, either Dubro as shown or Futaba, or whatever you have.

.015 x .250 from the K&S rack at the LHS. 6″ lengths of servo wire, either Dubro as shown or Futaba, or whatever you have.

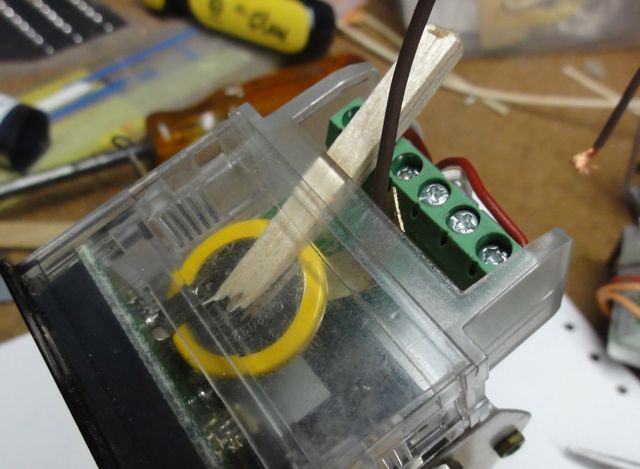
Butter the bottom of the neg. strip with epoxy and feed it down under the cell using small nose pliers. Locate it along the diagonal edge of the PC board. Then slip a balsa wedge over the top of the cell to hold things together while the epoxy sets.

Butter the bottom of the neg. strip with epoxy and feed it down under the cell using small nose pliers. Locate it along the diagonal edge of the PC board. Then slip a balsa wedge over the top of the cell to hold things together while the epoxy sets.

Smear epoxy on top of the positive strip and slip it into place as shown.

Smear epoxy on top of the positive strip and slip it into place as shown.

Secure a CR2032 cell holder to the back of the aluminum bracket with 2-face tape and solder the leads on neatly. Sometime around 2020-2022 the original battery will die.

Secure a CR2032 cell holder to the back of the aluminum bracket with 2-face tape and solder the leads on neatly. Sometime around 2020-2022 the original battery will die.

 Go to the Dollar Store, get a new one, and you’re good for ten more years, cheap.
The winder in the picture is a very old aluminum one, having an .063 hook shaft with an .032 hook grafted on. There were a few like that.
Several years ago, I wrestled with a couple of Radio Shack cell holders on a different project and they were a nightmare. I eventually found the British made Harwin, which costs $1.70 against RS’s $1.20 one, but they’re not even from the same planet. I can supply a Harwin cell holder, 2 lengths of the brass strip and 2 lengths of nice soft servo wire for about $4 shipped domestic. If you’re interested in making the mod, and can’t get hold of any other holder than the RS, it might be a good idea to let me put this together for you.
Art Holtzman
GO CHAIN GANG !!!

Statuses

Folding F1D Wing Tips

In Uncategorized on February 1, 2013 by nicholasandrewray

Folding  F1D Wing tips

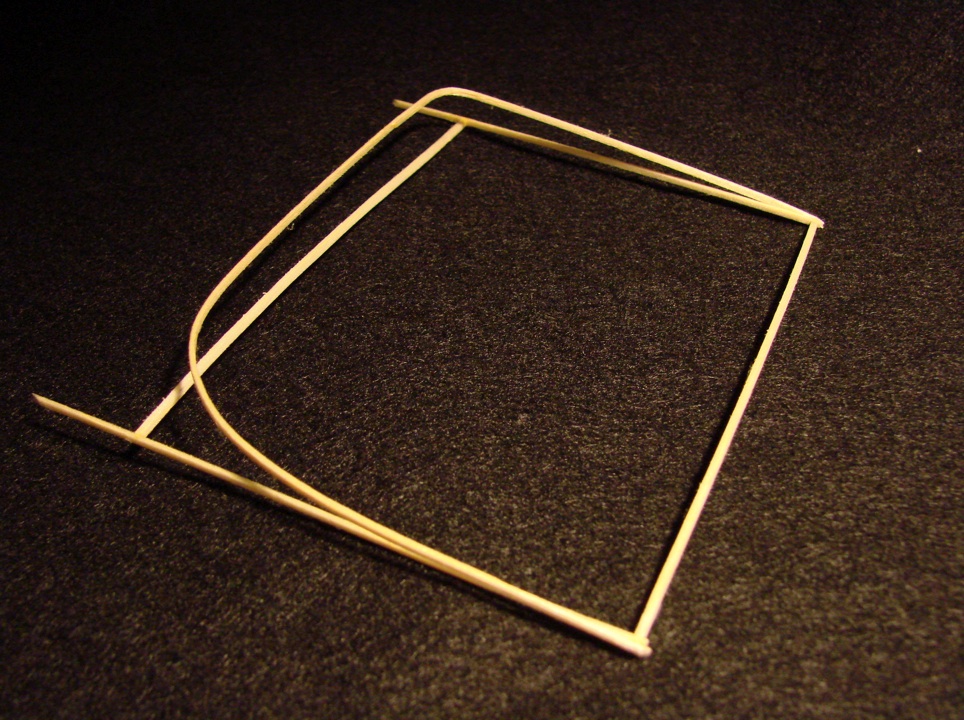
Whether you want to take along an extra wing or there is some question about your model box fitting into the overhead compartment of an airliner, here is a way to travel with a much shorter box. The wing tips are folded over so each wing will fit into a slot or box .7X8.5X15” or shorter depending on the length of the center panel. To use this system the dihedral joints are overlapped and it will be necessary to adjust the chord at those joints to comply with the 20 CM chord rule.

After the wing tips have been unfolded, the wing can be stored in one of those cardboard under the bed boxes. The box lies flat when disassembled and can easy be placed in with clothing or support gear and reassembled in a few minutes

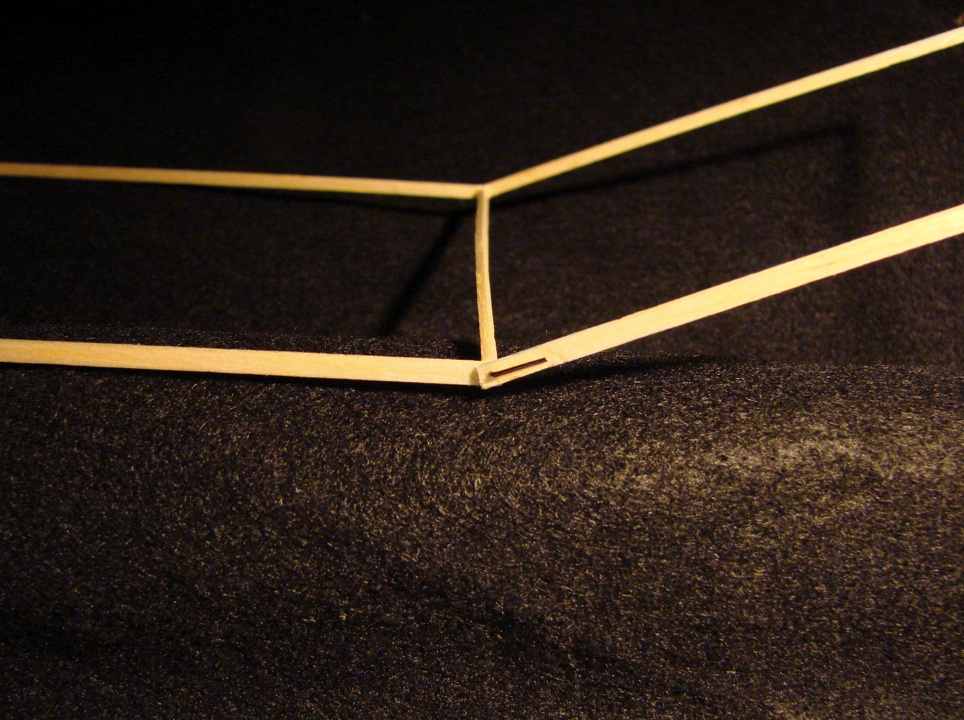
When building the wing, overlap each tip spar at the dihedral joint (.075”) and glue it to the main spar with Aliphatic (carpenters glue) and glue the ribs in with Acetate glue. There’s no reason to worry about the film or rib coming loose near the dihedral breaks when using Aliphatic to glue the dihedral joints. After the wing is removed from the building board, make up four wire hinges using short pieces of .005 music wire bend at ninety degrees. (Four hinges weigh less than .006 g) Make a piercing tool using a .4” long piece of .005” music wire mounted in a small dowel and it’s best to sharpen the piercing end. Back up the spar with a pair of tweezers or hold the dihedral rib with your fingers. Take the tool and pierce a hole in the center of the joint and rotate the tool while pushing it through the spar, glue joint and into the dihedral rib. Insert the hinge and line up the end so that it is parallel with the spar.

.005mw hinge to prevent wing tip from separating from main spar

.005mw hinge to prevent wing tip from separating from main spar

Wing tip in the folded position

Wing tip in the folded position

After the wing is covered, lay out a small piece of plastic or waxed paper under each dihedral joint. Lay a small weight on the spars near the inside of each dihedral rib and one right in front of each dihedral joint and puddle two drops of water under each joint. Lift up each tip about 1/2” with a piece of balsa so that the tip outline will bow near the dihedral break. It will take several minutes for the glue to soften and it might be necessary to place a little extra water on the joints, but don’t flood them. Slowly lift the tip a little more to place added pressure to each joint. The tip outline could break at the dihedral joint if you get in a hurry. The glue will usually let go all at once and the wing tip can be folded over on the center panel. Leave the small weights in front of each dihedral joint until the aliphatic glue hardens to make sure the joint doesn’t open when the tips are folded over joint. The wire is placed at each joint to prevent this from happening but I leave them in place for added security. Place a little extra Aliphatic glue at each dihedral joint.  Reverse the procedure to fold the wing back to its original length.

L Coslick

Statuses

International Indoor Postal Contest for A-6 and Ministick

In Uncategorized on January 28, 2013 by nicholasandrewray

8829167Willamette Modelers Club are hosting:


Statuses

Lutz Schramm’s World Championship F1D

In Uncategorized on January 7, 2013 by nicholasandrewray

Lutz Schramm’s World Championship F1D

 Only two models posted times in excess of 36 minutes at the 2008 F1D World Championships in Belgrade, Serbia. The champion Ivan Treger and second place finisher, Lutz Schramm.  Ivan’s model was a traditional design built to exacting standards with a refined prop hub while Lutz’s model displayed a new level of integration of composite materials.   How close was the composite model to the champion?  The difference was 29 seconds out of 71 minutes, 0.68%. Schramm 1

John Kagan, who nominated the model, reported that Lutz’s model was the talk of the contest with its innovative use of advanced materials.

Lutz says, “the special technical highlights are:  Wing post from Carbon tube; all ribs from Boron Balsa Boron layers also the propellers ribs. Rudder Outline from CFK; Propeller Outline from CFK. The propeller is without Propeller spar.”

Schramm 2

The mini-spar prop with its carbon outline shows clearly in this photo.

Schramm 3

The prop hub and carbon wing posts along with the model’s elliptical dihedral set it apart from the competition.

Please follow the link to download a PDF of Lutz Schramm’s Plan with the 2012 Propeller Design.

WM - Modell 03

Schramm Wood Sizes

Please follow the link to download a PDF of the Wood Sizes.